
WebComponents, Yo!
January 28, 2017. @pfrazee
TL;DR: I used Yo-Yo with WebComponents v1 to create a minimal React-like demo. Here's the link.
Now that WebComponents v1 have landed in Chrome, I decided it was time to give them a shot.
Why: I’m always looking for the most minimal and native option to build Web apps. In this case, native modularity is especially interesting.
A hypothetical import:
<link rel="import" href="https://twitter.com/com/tweet-card.html">
<tweet-card tweet-id="825412250991284224"></tweet-card>
(^ That doesn't exist yet so don't try it.)
WebComponents API
Google has a very good intro that covers the major points. Here’s the skeleton of an element definiton:
customElements.define('my-element', class extends HTMLElement {
  constructor() {
    super()
    // initialize any state
  }
  static get observedAttributes() {
    // tell the browser which attributes should fire the
    //   attributeChangedCallback() method on change
    return [/* attribute names */]
  }
  connectedCallback() {
    // event: element has been inserted to the DOM
    // do work here, including the first render
  }
  disconnectedCallback() {
    // event: element has been removed from the DOM
    // unregister any listeners
  }
  attributeChangedCallback(attrName, oldVal, newVal) {
    // event: an attribute in observedAttributes() has changed
  }
})
The recommendation is that you use a <template> element to define the markup, but I prefer Yo-Yo, which provides DOM-diffing via template literals.
function render (el, items, onclick) {
  return yo.update(el, yo`<div>
    My List
    <ul>
      ${items.map(function (item) {
        return yo`<li>${item}</li>`
      })}
    </ul>
    <button onclick=${onclick}>Add Item</button>
  </div>`)
}
Thus armed, I stepped through the ReactJS examples to recreate them. The Results are all on this page, and I'll step through their development here.

"Into the greenfield!"
index.html
First we pull in the imports:
<head>
  <title>WebComponents, Yo!</title>
  <link rel="import" href="./com/hello-label.html">
  <link rel="import" href="./com/seconds-elapsed.html">
  <link rel="import" href="./com/todo-app.html">
  <link rel="import" href="./com/markdown-editor.html">
</head>
Then we insert our components:
<hello-label label="Jane"></hello-label>
<seconds-elapsed></seconds-elapsed>
<todo-app></todo-app>
<markdown-editor></markdown-editor>
hello-label.html
I decided to take two passes on the elements, first with just WebComponents and YoYo, then second with a custom base class called HTMLYoYo.
Here is the basic approach:
window.customElements.define('hello-label', class extends HTMLElement {
  connectedCallback() {
    yo.update(this, yo`<hello-label>
      <div>Hello ${this.getAttribute('label')}</div>
    </hello-label>`)
  }
})
And here’s with my custom class:
window.customElements.define('hello-label', class extends HTMLYoYo {
  render() {
    return yo`<div>Hello ${this.getAttribute('label')}</div>`
  }
})
That should look familiar to anyone who’s done React before.
seconds-elapsed.html
This component shows a counter that increases by 1 each second.
The basic approach:
window.customElements.define('seconds-elapsed', class extends HTMLElement {
  constructor() {
    super()
    this.tick = 0
    this.interval = null
  }
  connectedCallback() {
    this.render()
    this.interval = setInterval(() => {
      this.tick++
      this.render()
    }, 1000)
  }
  disconnectedCallback() {
    clearInterval(this.interval)
  }
  render() {
    yo.update(this.baseEl, yo`<seconds-elapsed>
      <div>Seconds Elapsed: ${this.tick}</div>
    </seconds-elapsed>`)
  }
})
And with my custom class:
window.customElements.define('seconds-elapsed', class extends HTMLYoYo {
  static get observedAttributes() {
    return ['tick']
  }
  connectedCallback() {
    this.state.tick = 0 // Triggers a render
    this.interval = setInterval(() => {
      this.state.tick++ // Triggers a render
    }, 1000)
  }
  disconnectedCallback() {
    clearInterval(this.interval)
  }
  render() {
    return yo`<div>Seconds Elapsed: ${this.getAttribute('tick')}</div>`
  }
})
This shows lifecycle with connectedCallback and disconnectedCallback. We use the former to register the interval, and the latter to unregister it.
In my custom class, this.state is a Proxy object. It reflects the attributes of the HTML Element, and triggers a re-render when there’s a change. For React folk, it’s like this.props and this.state combined.
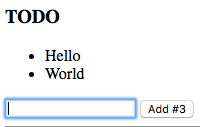
todo-app.html
Now a more complex example, a Todo List.
The basic version:
window.customElements.define('todo-app', class extends HTMLElement {
  static get observedAttributes() { return ['items', 'text'] }
  constructor() {
    super()
    this.handleChange = this.handleChange.bind(this)
    this.handleSubmit = this.handleSubmit.bind(this)

    // state:
    this.items = []
    this.text = ''

    // render a blank div
    this.innerHTML = '<div></div>'
  }

  // provide getters/setters for the attributes
  // this.items <=> this.getAttribute('items')
  // this.text  <=> this.getAttribute('text')
  get items() {
    try { return JSON.parse(this.getAttribute('items')) }
    catch (e) { return [] }
  }
  set items(v) { this.setAttribute('items', JSON.stringify(v)) }
  get text() { return this.getAttribute('text') }
  set text(v) { this.setAttribute('text', v) }

  // render on load or on attr change
  connectedCallback() { this.render() }
  attributeChangedCallback() { this.render() }
  render() {
    return yo.update(this.firstChild, yo`
      <div>
        <h3>TODO</h3>
        <todo-list items=${this.getAttribute('items')}></todo-list>
        <form onsubmit=${this.handleSubmit}>
          <input onchange=${this.handleChange} value=${this.text} />
          <button>${'Add #' + (this.items.length + 1)}</button>
        </form>
      </div>
    `)
  }

  // event handlers:
  handleChange(e) {
    this.text = e.target.value
  }
  handleSubmit(e) {
    e.preventDefault()
    var newItem = {
      text: this.text,
      id: Date.now()
    }
    this.items = this.items.concat([newItem])
    this.text = ''
    this.render()
  }
})

window.customElements.define('todo-list', class extends HTMLElement {
  // render on 'items' attr change
  static get observedAttributes() { return ['items'] }
  attributeChangedCallback() { this.render() }
  get items() {
    try { return JSON.parse(this.getAttribute('items')) }
    catch (e) { return [] }
  }
  render() {
    return yo.update(this, yo`<todo-list>
      <ul>
        ${this.items.map(item => yo`
          <li key=${item.id}>${item.text}</li>
        `)}
      </ul>
    </todo-list>`)
  }
})
And with my custom class:
window.customElements.define('todo-app', class extends HTMLYoYo {
  static get observedAttributes() { return ['items', 'text'] }
  constructor() {
    super()
    this.handleChange = this.handleChange.bind(this)
    this.handleSubmit = this.handleSubmit.bind(this)

    // state:
    this.state.items = []
    this.state.text = ''
  }
  render() {
    return yo`
      <div>
        <h3>TODO</h3>
        <todo-list items=${this.getAttribute('items')}></todo-list>
        <form onsubmit=${this.handleSubmit}>
          <input onchange=${this.handleChange} value=${this.state.text} />
          <button>${'Add #' + (this.state.items.length + 1)}</button>
        </form>
      </div>
    `
  }

  // event handlers:
  handleChange(e) {
    this.state.text = e.target.value
  }
  handleSubmit(e) {
    e.preventDefault()
    var newItem = {
      text: this.state.text,
      id: Date.now()
    }
    this.state.items = this.state.items.concat([newItem])
    this.state.text = ''
  }
})

window.customElements.define('todo-list', class extends HTMLYoYo {
  static get observedAttributes() { return ['items'] }
  render() {
    const items = this.state.items || []
    return yo`
      <ul>
        ${items.map(item => yo`
          <li key=${item.id}>${item.text}</li>
        `)}
      </ul>
    `
  }
})
This is the element where I discovered that, unlike in React, you need to serialize attributes into JSON to be able to pass them via HTML.
The basic version isn’t bad, but I can’t imagine myself doing heavy development with it. Almost certainly, I’ll want something like my HTMLYoYo class for a real app.
markdown-editor.html
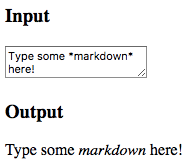
For this one, I just used my custom HTMLYoYo class.
window.customElements.define('markdown-editor', class extends HTMLYoYo {
  static get observedAttributes() { return ['value'] }
  constructor() {
    super()
    this.handleChange = this.handleChange.bind(this);
    this.state.value = 'Type some *markdown* here!'
  }
  handleChange(e) {
    this.state.value = e.target.value
  }
  getRawMarkup() {
    var md = new Remarkable()
    return md.render(this.state.value)
  }
  render() {
    var el = yo`
      <div class="markdown-editor">
        <h3>Input</h3>
        <textarea onchange=${this.handleChange}>${this.state.value}</textarea>
        <h3>Output</h3>
        <div class="content"></textarea>
      </div>
    `
    el.querySelector('.content').innerHTML = this.getRawMarkup()
    return el
  }
})
This illustrates what it takes to put unescaped HTML into the page.
base-class.html
It should be obvious from the examples that, while basic WebComponents + YoYo isn’t bad, you really want a custom baseclass to handle the boilerplate.
This is what my HTMLYoYo class looked like.
// our extension of HTMLElement

// provides automatic rendering after modifications to this.state
// just like React with .props and .state

// the HTMLElement attributes are also automatically reflected by this.state
// that means <my-elem foo="bar">
// will cause this.state.foo === "bar"

window.HTMLYoYo = class extends HTMLElement {
  constructor() {
    super()

    // create a shadow elem and give it a default innerHTML
    this.shadow = this.attachShadow({mode: 'open'});
    this.shadow.appendChild(yo`<div></div>`)

    // state is a proxy to the Element attribute methods
    // ...with JSON serialization for object values
    this.state = new Proxy({}, {
      has: (target, name) => this.hasAttribute(name),
      get: (target, name) => {
        try {
          return JSON.parse(this.getAttribute(name))
        } catch (e) {
          return undefined
        }
      },
      set: (target, name, value) => {
        this.setAttribute(name, JSON.stringify(value))
        return true
      }
    })
  }
  attributeChangedCallback(name, oldValue, newValue) {
    // when a watched attribute changes, render
    this.updateDOM()
  }
  connectedCallback() {
    // in case the subclass doesnt override, default to rendering
    this.updateDOM()
  }
  render() {
    // should be overridden
    return yo`<div></div>`
  }
  updateDOM() {
    yo.update(this.shadow.firstChild, this.render())
  }
}
I don’t plan to publish this until I iterate on it a few more times.
I think it’d be smart on my next pass to use both props and state objects, and to mimic the React API more closely, since the principle behind separating them is sound.
Closing thoughts
This is just my first pass with WebComponents and Yo-Yo, and I’m pretty satisfied the experience. I don’t particularly love the JSON serialization of attributes, but otherwise it all worked just how I wanted it to. 8/10 with rice.
I expect a minimal framework around WCs will round out the rough edges and make it ready for applications work.
Links:
Tweets: twitter.com/pfrazee
Code: github.com/pfrazee
Creating a peer-to-peer Web: beakerbrowser.com